


This bauble is made from several crocheted pieces which are joined or made around the bauble. First three 5-point stars must be made. They can be made separately and joined after or joined as they are made. Choose what you prefer. I joined them as they were made.
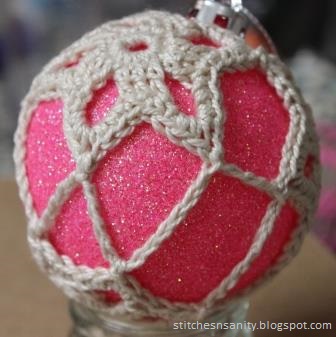
 When joined, the stars should form a hexagon. See the photo for clarity.
Materials:
- Crochet cotton (4ply)
- 2.5mm hook
Stitches used:
- Chain (ch)
- Single crochet (sc)
- Double crochet (dc)
- Slip stitch (slst)
Note that there are two star patterns for this bauble. The top “5-Point Stars” and base “6-Point Star”.
5-Point Star (make 3)
Instruction
|
Comments
|
|
Start
|
Magic loop, do not tighten yet
|
|
Row 1
|
Ch, 15sc, slst
|
Tighten as appropriate, approx. 5mm diameter.
|
Row 2
|
Ch3, 2dc, [ch5, 3dc] repeat 4 times, ch5, slst
|
Dc stitches are completed in each sc of previous row.
|
Row 3
|
Ch2, [sc in 3rd dc, (3sc, ch2, 3sc), sc in 1st
dc]
repeat 3 times,
sc in 3rd dc, (3sc, ch2, 3sc), slst
|
Instructions in the round brackets are done in the ch5 space.
|
End
|
Tie off and break thread
|

Join the stars together as shown in the above photo.
Create a slip knot and pull it through the middle point of one of the stars (see red circle).
From there:
[ch 12, slst to next point (same star), ch 4, slst to next point (next star), ch 12, slst to next point] repeat 2 times.
This row should end with the final slst meeting the start point. Tie off and break thread.
Now lay the piece over a bauble. The nubbin of the bauble should sit in the centre of the hexagon made by the stars. The base star will be created next and will close the piece by joining to the chains.
Again, the star can be created whole first and joined later. I found it easier to just join as I go.
Start the star separately from the other piece (now covering the bauble).
6-Point Star
Instruction
|
Comments
|
|
Start
|
Magic loop, do not tighten yet
|
|
Row 1
|
Ch, 12sc, slst
|
Tighten as appropriate, approx. 5mm diameter.
|
Row 2
|
Ch3, 1dc, [ch4, 2dc] repeat 4 times, ch4, slst
|
Dc stitches are completed in each sc of previous row.
|
Row 3
|
Slst to chain space, [2sc, ch1, 2sc] repeat 5 times, slst
|
Instructions in the square brackets are done in the ch4 space.
When completing ch1, pull thread through chain space of other piece
to join.
|
End
|
Tie off and break thread
|
(Note: if the instruction in row 3 does not make sense, just know that the ch1 is the point of the base star and should be attached to the chain space of the previous piece. Join it however you see fit if my instruction doesn’t make sense.)
Make sure to tuck in all your loose threads. I like to do it right at the end with this project. Glitter baubles make it especially easy to position threads out of sight. It acts like Velcro. If only tucking threads were so simple in all projects!
My 6 point star only has 5 points. (Tried it twice because I'm a newbie.) Also I think Row 2 of 6 point should say Ch3, 2dc.
ReplyDelete???
Thanks for these. I've done a couple of the others.
Hi Sunspotmom,
DeleteThank you so much for your feedback.
I'm sorry for the error. You're absolutely right about row 2; it should actually be ch4, 2dc in the square brackets. I've updated the pattern now and if you complete the star like this it should work. However, if you have a looser tension than I do, you might prefer to do ch3 instead of ch4.
I'm still new to pattern writing so I really appreciate your help in finding my mistakes.
Thanks again and enjoy!